Sunday, February 24, 2013
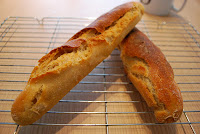
French bread biscuits
So, this is how I rescue these dry breads. Simply, slice the bread thinly, spread butter on each slice, sprinkle sugar on top and bake in 160ºc oven for 20 minutes. You'll get a nice sweet snack.
Give the old bread a new life before you give it to the birds.... :D
Enjoyed the article?
My best content on baking, cakes and breads. Delivered to you for free.
Friday, February 22, 2013
Soft taro bread
Mashed taro potatoes gives the bread nice soft texture. I also use milk as the liquid to make the bread even softer and look nicely white inside.
Next time you get taro potatoes, save some to make these super soft rolls. You won't taste the taro but will be amazed how soft they are!
Ingredients:
Enjoyed the article?
My best content on baking, cakes and breads. Delivered to you for free.
Thursday, February 21, 2013
Tofu waffle sticks
 I made healthy tofu waffle sticks for breakfast. They were perfect finger food for my girl and she seemed to love the sticks. She ate four of them! Of course, they are great for big kids too (if there are any left...). ;D
Ingredients:
Enjoyed the article?
My best content on baking, cakes and breads. Delivered to you for free.
Monday, February 18, 2013
Happy Birthday to Chris
I made a cheese dome cake. I started decorating the cake with Maltesers chocolate because I knew she would love it. As I was putting the Maltesers, the cake started to look like a face, so I decided to turn it into a face, which ended up looking a bit funny...
Surprisingly, Chris had made a dome cake for dessert too! What a coincident! Hers was ice cream cake, hummm, that was very nice.. ;D
Once again, Happy Birthday to Chris! :D
Oh, by the way, the face is not her face...
Enjoyed the article?
My best content on baking, cakes and breads. Delivered to you for free.
Sunday, February 17, 2013
Baby shower cake
I can't wait to see the baby girl. Good luck to Mary and Yung!
And also, thanks to Sam for hosting such a lovely baby shower. ;D
Enjoyed the article?
My best content on baking, cakes and breads. Delivered to you for free.
Friday, February 15, 2013
Valentine's Day dessert
For dessert, I made lime cheese cake with crushed macaroon and sugared strawberries.
 The whole full course dinner experience at home was great. I felt much more comfortable than going to a posh restaurant. And the best thing is I was given a 'hungry monkey' size dish. You don't get that much food in a posh place, do you!
Enjoyed the article?
My best content on baking, cakes and breads. Delivered to you for free.
Thursday, February 14, 2013
Valentine's Day - Tomoto round bread ♥
To start with I made a lovely coloured tomato bread in the round tin, and I'm cutting it into hearts ♥♥. Andy and Lana already had some for breakfast, and they seemed to like them. ;D
Now, it's time to do the prep for dessert...
Ingredients:
Enjoyed the article?
My best content on baking, cakes and breads. Delivered to you for free.
Wednesday, February 13, 2013
French style bread 2
Here I am again, this is my 'French style bread at home' take 2! I've changed the amount of water and salt. I also made DIY steam oven by preheating the oven with baking beans and pouring hot water onto them when I put the bread in the oven. There are few other things I tried differently to the last time.
....And..., Look, it's improved! The crust is looking much better! The flavour was there! However, it didn't have as many air pockets as I wanted. The 'slits' on the bread needs more work.
So things I did this time:
1) 68% water.
2) I used a small amount of dough that I kept from last time. (Apparently at artisan bakeries it's a know practice to keep a bit of dough to use it next time.)
3) I did 'knead (or rather fold) and rest 20 minutes' three times, before I put the dough in the fridge.
4) 'DIY steam oven'
I'm getting there! Next time, I'm going to get more uneven air pockets!
See previous French style bread
Enjoyed the article?
My best content on baking, cakes and breads. Delivered to you for free.
Tuesday, February 12, 2013
Yeast Pancake
Instead of baking powder, I used yeast as a rising agent and it made lovely soft think pancakes! I intentionally prepared a small amount of mixture last night that was just enough for the breakfast... because I didn't want to fill myself up in the morning in case there are more pancakes later on!
Ingredients:
Enjoyed the article?
My best content on baking, cakes and breads. Delivered to you for free.
Monday, February 11, 2013
Flaky square bread
I tried out one of the recipes that I've had in mind for a while, which involves puff pastry. I wasn't sure whether it would work or not, but the result was pretty good.
The bread was very soft so I struggled a little when I took it out from the tin, but I was please to see nice sharp corners. With the high butter content from the puff pastry, the bread is nicely flaky and has rich buttery flavour. It definitely nice when it's cut thick and toasted, which brings up the flavour of the butter even more!
I used my own puff pastry but ready-to-roll ones from shops will do the job. Unfortunately I don't know where you can find these tins in the UK, but they are available on Amazon Japan
Ingredients:
Enjoyed the article?
My best content on baking, cakes and breads. Delivered to you for free.
Friday, February 8, 2013
French style bread
Yesterday I attempted to bake crusty french style bread based on what I've read.
Here are some of the things I did:
1) I made starter the day before. (I mixed strong 125g flour, 75g water, and yeast 1g.)
2) I proved the dough in the fridge overnight.
3) I didn't knead the dough but used a wooded spatula to form the dough.
4) I added more water than I normally do.
5) Baked in higher temperature.
... And the result was... ok, I don't think it was quite there yet, but it was not bad. It was crusty outside and the texture was nicely chewy. However, there wasn't enough air pockets, and the round shape ones became a bit flat. I think I overproofed the dough.. I also think I should have added a little less water and a little more salt.
It was still lovely to dip in the soup and after all they were tasty and we did destroy them all... They kind of grew on us as we ate...
There is definitely a room for improvements. I can't wait to try it again soon and will be updating the progress to my perfect french style bread.
If anyone have any tips or advice, please let me know! :D
Enjoyed the article?
My best content on baking, cakes and breads. Delivered to you for free.
Monday, February 4, 2013
Round loaf
Anyway, I used the tin to bake my Milk Rye bread again. Since I cannot see the inside once I put the other half of the tin, I was bit worried (and excited) to see how the bread was done. When I opened the tin...., it was... PERFECT!
I used 500g of the dough and when the dough rose about twice the size, I put the other half of the tin and waited for another 10 minutes, then baked it. Make usre you take out the bread from the tin as soon as it comes out of the oven or the bread gets soggy because of the moist inside the tin.
The tin even have waves so when you cut it you get nice even slices! Perfect for a buttery toast... ;) I can see this tin is going to be my new friend in the kitchen. :D
The tin is available on Amazon JP
Enjoyed the article?
My best content on baking, cakes and breads. Delivered to you for free.
Friday, February 1, 2013
Milk Rye bread
I used 'Yudane' method (湯だね) to make a nice soft bread with an unique flavour of rye. This time I also made a starter by using much less yeast than usual, flour and milk (I call it 'Nakadane' in my recipe below).
After a long preparation, the bread came out just how I wanted. My girl loved it. She ate almost the whole thing. I dipped it into a home made super spicy tomato soup. Look! My bread looks as if it was in a bath of tomato soup! ;D

So..., today's baking session was really good. It certainly lifted up my '.......☁☹☔' mind a bit. And... most importantly it was very rewarding to see Lana eating it so well. ;)
Ingredients:
Enjoyed the article?
My best content on baking, cakes and breads. Delivered to you for free.


