Monday, September 30, 2013

Happy Birthday to Pete!

Happy Birthday to Pete ~♪
It was my dad-in-law's birthday last Friday, and we had his birthday dinner on Saturday.

And, this is the cake I made for him! What shall we call it, 'face cake'? This is probably one of my favourite birthday cakes I've ever made. ;D

Andy and I made a stencil cut out of his face on a piece of paper and placed it on the cake, then I sprinkled cinnamon icing sugar to make his face appear on the cake. How cool is that! Even we, who made the cut out, was amazed how good it came out and how much it looked like him!


I kept the other decoration simple. The cake was coated with cream and funfetti macarons were placed on the bottom.


For the inside, I did checkerboard cake (I made it for Ony's birthday too, that was vanilla and chocolate...), this time I made brown sugar and mixed spice sponge cake, and hazelnut sponge cake.


Although we were very full after the main meal, we managed to squeeze a small slice of cake;)

I'm so up for doing this 'face cake' again for other occasions. In fact, I might start taking orders for it...

Happy birthday to Pete, and thank you for the lovely dinner! ;D

Enjoyed the article?

My best content on baking, cakes and breads. Delivered to you for free.


I won't send you spam. Unsubscribe at any time.

Wednesday, September 18, 2013

Orange brioche

So, as I mentioned before (on my Orange custard cream post), here is my orange brioche made with my banana yeast starter. It has a orange jam sauce mixed in the dough and orange custard on the top.

I think these buns are a perfect example of how versatile the sourdough starter can be. They've got such a nice soft texture and buttery richness that I'm sure they are pretty different from what you imagine as sourdough bread;)

Being quite a wet dough, it's pretty tricky to handle it so I strongly recommend using a mixer for kneading. You will also need to knead (oops..;D) longer than ordinary loaves (such as my Strawberry yeast bread) and it might be difficult to judge whether the dough is ready or not. But don't worry, when in doubt, we always go back to the basics. Feel the dough, stretch it to see it's nice and stringy and doesn't break.

This rich dough takes more time to prove too. I left the dough overnight to let it prove (it was about 10 hours on a warm day, so it can be longer on a cooler day) and then rested it in the fridge for half a day. This resting action is quite important to make it easy to shape the bread.

I haven't got brioche tins but tartlet tins worked ok. I added some orange custard on the top, then put a small piece of dough to cover it.


Not only were they a good energy booster in the morning, but also they were an excellent treat with coffee in the afternoon. :)

Ingredients:

Starter (banana) 125g
Very strong flour 250g
Salt 3g
Honey 50g
Butter 50g
Egg1+Egg yolk 2 + milk = 168g
Orange jam sauce 2-3tbsp

*I will post the brioche recipe some time but for now, please refer to the Banana buns Recipe for the method.

Enjoyed the article?

My best content on baking, cakes and breads. Delivered to you for free.


I won't send you spam. Unsubscribe at any time.

Tuesday, September 17, 2013

Gluten-free Coconut Lemon Tart

Coconut is one of the great alternatives to flour when it comes to gluten-free baking. I use just the coconut flour as a substitute of flour for my Coconut Swiss Roll, which works very well. However, for tarts or cakes that requires more height, you do need some more fine flour substitutes such as gluten-free plain flour or rice flour.

With this coconut tart, I used gluten-free plain flour, same as my Gluten-free Bakewell tart, but replaced some flour with the coconut flour and I also used coconut flour in the filling. When the tart was in the oven, the kitchen was filled with the smell of beautiful coconut and refreshing lemon... I couldn't wait to taste it!

Ingredients:
Pastry
Gluten-free plain flour 200g
Coconut flour 50g
Butter 100g
Sugar 100g
Egg 1
----
Lemon filling
Lemon 2 (juice and zest)
Sugar 150g
Egg 1
Butter (melted) 85g
Coconut flour 30g

1. Prepare the pastry. (follow the Sweet pastry recipe).
2. Preheat the oven to 180ºc. Blind bake the pastry for 10 minutes.
3. Make the filling. Combine all the ingredients together, and mix well.
4. Pour the filling in the blind baked tart. Bake 35 minutes. (If the top of the tart start to brown, cover with foil.)
5. Chill in the fridge for at least 2 hours, or overnight.


The crusty coconut pastry is a perfect match with the sweet lemony filling... ;D

More tart?

Enjoyed the article?

My best content on baking, cakes and breads. Delivered to you for free.


I won't send you spam. Unsubscribe at any time.

Friday, September 13, 2013

Gluten-free Orange & Poppy seed Swiss roll

With the orange custard and orange 'jam sauce' thing on my previous post, I made this gluten-free cake, Orange & Poppy seed Swiss roll.

I'm getting quite into the gluten-free baking and wanted to see how my basic Swiss roll sponge would come out with the gluten-free flour (I use Doves Farm plain white flour.). It worked so well that I could barely tell the difference and so did some people who ate the cake. Only thing was with the gluten-free flour the sponge cake was softer, which made the rolling action a little tricky.


The recipe for the sponge cake is the same as my basic Swiss roll. I just replaced the flour to gluten-free flour, then added a few table spoon of orange jam sauce, and folded a good amount of poppy seeds in the sponge.

For the cream inside, I mixed orange custard with whipped cream. Oh, I love custard and whipped cream together, and with a nice orange flavour with it, it simply cannot go wrong!


When you make Swiss rolls for customers or as a gift, I need to trim the ends, and they are, obviously, for me! ;D This time I put them in the freezer and had them a few days later. I couldn't wait for the cake to be completely defrosted so I had it half frozen, and guess what... it tasted amazing! It really was a treat for the baker! Please try it when you have Swiss roll next time;D

Basic Swiss Roll Recipe

More Gluten-free Swiss roll;
Coconut Swiss Roll

Enjoyed the article?

My best content on baking, cakes and breads. Delivered to you for free.


I won't send you spam. Unsubscribe at any time.

Wednesday, September 11, 2013

Orange custard cream

The other day I made orange custard cream... well, I was going to make orange curd but as I didn't have specific recipe in mind and I was kind of going with the flow, I ended up making more like an orange custard than curd, which turned out to be rather tasty! ;D

So the recipe goes like this...
Ingredients:

Orange 2
Sugar 50g
Butter 25g
Cornflour 1 tbs
Egg 1
Egg yolk 1

1. Squeeze the juice out of oranges. Keep 1 tbsp of the juice aside and combine the rest of the juice with sugar and butter in a pot.
2. Bring the pot to boil and strain the liquid.
3. Mix cornflour and 1 tbsp of orange juice.
4. Add 3 into 2 and mix well.
5. Beat the egg and egg yolk and mix into 4. Put the pot back on a low heat.
6. Stir constantly until the liquid thickens.

I'm not a big fan of orange skin so I don't add zest of orange but if you want more punch, then please go for it.

After squeezing the juice, I boiled the remaining of oranges with water, and then pureed in the food processor. I cooked the pureed oranges again with some ginger syrup (approximately 4 tbsp) and strained the liquid to make orange and ginger jam-sauce type thing (it wan't as thick as jam...)

This by-product was also very nice! I used it in the bread and cake, both of which had really nice refreshing orange flavour. :)


I used the orange custard cream as a filling of my Match macarons. And oh yes! Holly molly, the combination of match and orange tasted amazing...

Recipes for the gluten- free cake and brioche I made with the orange cream and 'jam-sauce thing' will be coming soon! Don't miss them;D

Enjoyed the article?

My best content on baking, cakes and breads. Delivered to you for free.


I won't send you spam. Unsubscribe at any time.

Wednesday, September 4, 2013

Cinnamon Roll Loaf

I made my regular Milk and Honey loaf dough with a good intention of making cinnamon rolls with it but instead ended up making a loaf...


When I wake up early in the morning to bake, my body is up but my brain is sometimes still left in bed, and that's what happened when I was making this bread. I made the cinnamon butter filling then spread it on the rolled out dough. Next thing I knew, I was folding it as I do when I make a marble loaf... By that time, I said to myself it would be like a big cinnamon roll and taste pretty much the same...

So that's how the Cinnamon Roll loaf was made! It was actually very nice. In a way a slice of this loaf was much easier to eat (especially for a little person, it's not as sticky as normal cinnamon rolls.)

The cinnamon butter filling is a great option for those who are avoiding sugar as I use honey instead of sugar. It can, of course, be used for usual cinnamon rolls, or spread it on a slice of toast and you will have an instant cinnamon roll toast! ;D

The cinnamon butter filling:

Butter 3 tbsp
Cinnamon 1 tsp
Honey 2 tsp

Mix well all the ingredients together.

Enjoyed the article?

My best content on baking, cakes and breads. Delivered to you for free.


I won't send you spam. Unsubscribe at any time.

Tuesday, September 3, 2013

Strawberry yeast bread - 3

It's already September but we are still enjoying the summer heat here in England, which is great for being out and about, but not so great for my sourdough starters...

While it's hard to maintain sourdough starters on hot days, there is an advantage that we can take in this heat. Instead of making and keeping a fully matured starter, I often do the straight method by using a liquid starter.

Because of the hot weather, the liquid yeast gets very active and ready in much shorter time, and the dough rises much more easily.


My strawberry starter took 3 days, and banana starter was ready in only 2 day! By using this method not only will nice crusty sourdough bread be ready in 3 to 4 days but also you have less job in maintaining the starter (therefor less likely to fail...).

You can use any fresh or dried fruits (make sure they aren't coated with oil) or vegetables, but the ones with high sugar are easier to get started. Strawberries are perfect as they are cheap in summer and have a really nice flavour to it. Bananas are good all year around too.

All you've got to do is to follow the steps of Strawberry yeast starter until step two, then use that liquid to make your dough.

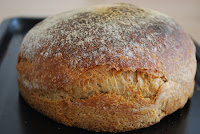
I made strawberry one again... this time with the strawberries that I used to make the liquid starter. Look at this beautiful crust! :D


Good bread and cheese is my ultimate sandwich combo...

More about strawberry yeast bread? Have a look at:
Strawberry yeast bread - 1
Strawberry yeast bread - 2

Enjoyed the article?

My best content on baking, cakes and breads. Delivered to you for free.


I won't send you spam. Unsubscribe at any time.

Monday, September 2, 2013

Soufflé Cheesecake

From rich creamy ones to non baked types, I love all sorts of cheesecakes, but this weekend I had a sudden craving for this very Japanesy soft cheesecake, Soufflé Cheesecake. ;)

As the name suggests, this cheesecake is very light like a soufflé and quite literally melts in your mouth as you eat. I had a slice in the evening after eating a lot of pizzas (again!). Although I was very full I destroyed the cheesecake with no problem. It's such a light cake that I could eat two, three slices easily!

To make this soufflé type cheesecake requires bit more than just keep adding the ingredients and bake (Don't get me wrong, The WOS cheesecake is still one of the best cheesecakes too!).

There are two things to remember.

One, beat the egg whites just to the right point. We want soft peak. If the egg white is not beaten enough then the cake will not have nice light texture and will lack the height. However, if the egg white is beaten too much, it will become difficult to fold in.
Two, steam bake on a low heat. Make sure that the tray always has water in it. If the water gets low during the bake, add more boiling water.


I like to keep mine as light as possible, but you can add biscuit base to give it a bit of crunch. ;)

Ingredients

Cream cheese 250g
Milk 250g
Egg 5
Sugar 100g
Plain flour 50g
Lemon 1

1. Preheat the oven to 180ºc with a tray filled with hot water.
2. Heat up cream cheese, milk and half the sugar on a low heat until they are combined well. Set aside to cool down.
3. Separate the eggs. Add egg yolks into the cream cheese mixture and mix well.
4. Sift flour into 3. Fold.
5. In a separate bowl beat egg whites with the remaining sugar and juice of lemon to soft peak.
6. Add 1/3 of beaten egg whites into 4. Fold gently until it's mixed in well. Fold another 1/3 of egg whites and mix well. Repeat the same process with the remaining egg whites.
7. Pour the mixture into a greased and lined tin. Smooth the surface.
8. Turn the oven down to 160ºc. Put the tin on the water filled tray and bake for 60 minutes (if the top starts to get too dark, cover with foil).
9. When the cake is baked leave it to cool in the oven before taking it out of the tin. Chill in the fridge.

Enjoyed the article?

My best content on baking, cakes and breads. Delivered to you for free.


I won't send you spam. Unsubscribe at any time.