Wednesday, May 30, 2012

きなこカップケーキ (Kinako cupcake)

きなこ(kinako, soy powder) is one of my favourite food since I was a little kid. I used to sprinkle sweetened kinako on my rice which is for me an ultimate comfort food...

Yesterday I fancied a comforting Japanese sweet so decided to make some cupcakes with kinako. I mixed kinako in my very easy basic cupcake recipe and used dark brown sugar for a rich taste.

It took me only less than 30 minutes to make this cupcakes which is really handy when you have a little baby. These cupcakes are fairy healthy too that is another good thing when you're watching your diet. (I kind of am... because of breast feeding...)

The cupcakes tasted very "homely" which was just what I was looking for... I loved them, but Andy said "it's not for me..." because he doesn't really like kinako... Ok well, if you like kinako, then that's for you...:)

If you like your cupcake sweet then add more sugar (you can add up to 100g or so...)

Ingredients:

Flour 70g
Kinako 30g
Baking powder 1 tsp
Dark brown sugar 50g
Egg 2
Butter 100g

1. Preheat the oven to 180ºc. Melt butter.
2. Beat eggs and sugar together until it's light and fluffy.
3. Mix in melted butter into2.
4. Sift flour, kinako, baking powder into 3.
5. Pour the mixture into cupcake tins and bake in the preheated oven for 15 minutes.


Enjoyed the article?

My best content on baking, cakes and breads. Delivered to you for free.


I won't send you spam. Unsubscribe at any time.

Tuesday, May 29, 2012

Cheesy scone

I am a Cheese Monster.... from mild Cheddar to matured Camembert I love all sorts of cheese except.... Blue cheese... And there was a block of blue cheese in a pack of cheese selection that we had the other day. I didn't want to waste it so I decide to use in my baking.

This time, cheesy scones. A strong cheese like blue cheese goes really well with honey so I added a good couple of squeeze of honey,... and it worked amazingly;)

The saltiness of cheese and the sweetness of honey was simply a marriage made in heaven... So good that I kept going back for more and more!

This recipe will work with other cheese too. Try it with your favourite cheese. ;)

Ingredients:

Plain flour 100g
Strong wholemeal flour 150g
Sugar 20g
Baking powder 2 tsp
Butter 80g
Cheese (crumbled) 70g
Honey 70g
Egg 1

1. Mix Plain flour, Strong wholemeal flour, Sugar, and Baking powder together. Cut Butter into a dice shape.
2. Put the butter and cheese into the flour mixture, and mix them with your fingers until they become crumbs.
3. Beat an egg and mix into 2. Place the mixture onto a lightly floured surface and kneed until it stick together. (DO NOT kneed too much as it will make scones hard.) Wrap the mixture in a cling film and rest it for 30mins.
4. On the lightly floured surface roll 3. to 1 inch thickness.
5. Preheat the oven to 200º. Cut 4 into a round shape (or any shape you like).
6. Bake them for 15-20 minutes until the top is slightly brown.

And for my basic scone recipe, visit The World of Sweets - Scone.

Enjoyed the article?

My best content on baking, cakes and breads. Delivered to you for free.


I won't send you spam. Unsubscribe at any time.

Monday, May 28, 2012

Cupcakes for our new car

This weekend we had an exciting new arrival... a new car, BIG ONE! Yay!

Now, I can drive in the UK for the very first time because it's an automatic car! And and, our baby stuff fits perfectly with lot more other stuff. Plus, it's got one of my favourite things... electric sliding door... oh...."like"...

So, I made cupcakes for the guys who helps us to pick this car. Black chocolate cupcake for our black car...:D Thank you:)

Apparently these cupcakes are so moreish that one of the sales people came up to the car as we were leaving and asked for us to drop in with more cakes! There is nothing more satisfying than seeing a happy smile made by my cake;)

Enjoyed the article?

My best content on baking, cakes and breads. Delivered to you for free.


I won't send you spam. Unsubscribe at any time.

Monday, May 21, 2012

Mint biscuit

Now, we've finally got a house with a garden, and I can't wait to get started with growing my own veggies and fruits. Luckily the previous owner of the house has kept the garden very nice and neat, there are already thing I can use...

One of the things I found was mint! Humm, nice fresh smell. There was no way I wouldn't experiment with those fresh herbs in my baking. So, I've decided to make biscuits with a "hint of mint" (that's what Andy said...nice rhyming...)


As soon as I started preparing the dough, from the smell of fresh mint and sweet biscuit dough I could already tell they were going to be pretty awesome. After 20 minutes, they came out from the oven nice and golden. We tasted them straight away with our dinner.

I was like..."Oh... my..., I think I'm genius... This is so good!" Yes indeed, it was one of those moments that I was really pleased with my experimental recipe. ;D

We also try them with cheese, which brought the flavour of mint more and tasted really nice too:)

I'm going to try this recipe with other herbs next time!

Ingredient:

Flour 100g
Butter 50g
Sugar 50g
Egg yolk 2
Baking powder 1/2 tsp
Salt pinch
Fresh mint leaves (chopped) 1 tsp

1. Preheat the oven to 180ºc. Cream butter and sugar together.
2. Add egg yolks and mix well. Mix in mint leaves.
3. Fold flour, baking powder and salt into 2.
4. Knead lightly until the mixture come together and smooth.
5. Wrap with cling film and rest in the fridge for at least 30 minutes.
6. Roll out the dough on a floured surface to 5mm thickness. Cut out the dough and place on a baking sheet.
7. Bake in the preheated (180ºc) oven for 20 minutes or until the biscuits become slightly golden. 


Enjoyed the article?

My best content on baking, cakes and breads. Delivered to you for free.


I won't send you spam. Unsubscribe at any time.

Tuesday, May 15, 2012

Lemon meringue tart

Tart is one of my favourite cakes to make, and of course to eat:)

For the party we had a few weekends ago, I made this lemon meringue tart. Once the tart case is ready, this classic lemon tart is very easy to make. I made the tart myself (since that's the bit I like the most about tart making;D), but ready-to-roll sweet shortcrust pastry will do the job.

The fresh and tangy lemon filling, and crunchy outside, chewy inside meringue on the crispy golden pastry.... It was simply unbeatable... sooooo good... 

This time I made it in a 9 inch tart tin but I've decided that I'll use little tartlet tins next time so that I don't accidentally eat too much... (I must have had quarter of the big tart...ooops...)

Here is how to make this all time classic ;)

Ingredients:
Sweet pastry
Flour 250g
Sugar 125g
Butter (cold diced) 125g
Egg 1
Salt pinch

Lemon filling
Fresh lemon juice 150ml
Lemon zest 1 tsp
Sugar 100g
Double cream 60ml
Egg 3
Egg yolk 4

Meringue
Egg white 4
Sugar 200g

1. Make the sweet pastry. Mix sugar, salt and egg in a bowl.
2. Sift flour into 2 and stir until the mixture becomes sandy.
3. Add butter into 2. "Cut in" the butter by using a dough scraper.
4. When the mixture has combined, take the dough out on a floured surface and knead lightly until it becomes smooth pastry. Cover  and chill in the fridge for at least 1 hour.
5. Roll out the pastry on a floured surface to 5mm thickness. Line the pastry on a buttered and floured tart tin. Chill in the freezer for 30 minutes.
6. Preheat the oven to 190º. Line the pastry with baking sheet and fill with uncooked rice. Bake for 10 minutes and remove the baking sheet and rice and put the pastry back in the oven for 15 minutes or until the pastry is golden brown.
7. Prepare the filling. Combine lemon juice, lemon zest and sugar and mix well.
8. Add cream into 7 and mix well.
9. Beat eggs and egg yolks into 8 one at a time.
10. Pour the filling into the tart case. Bake for 15 minutes until the filling is set. Let it cool.
11. Make the meringue. Beat the egg white and sugar together in an electric mixer until it forms stiff peaks. Pipe the meringue on the tart.
12. Put the tart in the oven (120ºc) to colour the meringue.

Enjoyed the article?

My best content on baking, cakes and breads. Delivered to you for free.


I won't send you spam. Unsubscribe at any time.

Friday, May 11, 2012

Very moist lime cake

After the last weekend's party, we had a lot of limes and cream left over from making cocktails and mocktails. So, I decided to use them up in my cake as usual;)

This time it's a variation of my "non butter cream cake". I've changed lemon to lime and quantity of eggs. I also made lime syrup to brush the cake to give it as much lime flavour as I can. :D

I've left the cake in the fridge overnight to let the syrup properly soak in. When I took the cake out of the fridge the following morning, I smelt of lovely citrus flavour, and as soon as I bit into it, the sweet and tangy taste of lime spread in my mouth... Humm, heavenly...

It's nice to eat soon after the cake is cooled but it's better wait until next day so that it becomes really moist and juicy, just how I like it!

Ingredients:

Plain flour 200g
Baking powder 1 tsp
Double cream 250g
Sugar 150g
Egg 2
Lime juice 3 tbsp
Lime zest 1 tsp

1.Sift flour and baking powder together. Preheat the oven to 180ºc.
2. Combine double cream and sugar in a bowl and mix to just before "soft peaks".
3. Mix in eggs, lime juice and lime zest to 2.
4. Fold in flour and baking powder.
5. Pour the mixture into a cake tin. Bake in the pre heated oven (180ºc) for 40 minutes.
6. While the cake is in the oven, prepare the syrup. Combine all the ingredients for the lime syrup in a bowl. Put in the microwave for 3-4 minutes. (Be careful, it gets really hot!)
7. When the cake is done, pour the syrup over the cake while the cake is hot.

Enjoyed the article?

My best content on baking, cakes and breads. Delivered to you for free.


I won't send you spam. Unsubscribe at any time.

Tuesday, May 8, 2012

April fool's day dinner

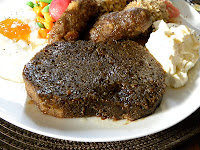
It's been more than a month since April fool's day and I know it's a bit late to talk about it but I did make April fool's dinner (in fact I made it and we enjoyed it the day before) just like I did last year (Seen my fish?), but it was kind of put aside in my head BECAUSE I went into labor on that very day! Anyway, before I forget..., here it is, this year's April fool's day dinner, "Premium steak platter" with beer. And of course, all the things are sweet!

So this is what we had...


Well-done steak - Dark brown sugar cake cut into a steak-like shape and coated with treacle sauce.


Creamy mashed potato with black pepper and gravy sauce - Cream cheese with poppy seed. caramel sauce for the gravy.


Sausages and fried prawns with tomato sauce and tartar sauce - Dark brown sugar cake shaped into sausage and prawn. Fried prawns are coated with icing and walnuts. Pink icing for the tail of the prawn. Raspberry jam for the tomato and cream cheese for the tartar sauce.


Runny fried egg and veges - Milk jelly with apricot jam on top. Coloured marzipan for the veges.
Ice cold beer.
- Apple jelly topped with frothy milk.

To be honest, I felt slightly sick from all the sugary stuff. But, well, I was very pleased with how realistic it looked:)
Can't wait to try more of fake savory dinners!

Enjoyed the article?

My best content on baking, cakes and breads. Delivered to you for free.


I won't send you spam. Unsubscribe at any time.

Monday, May 7, 2012

My little assistant - House warming & Wet the baby's head party -

We had a "house warming & wet the baby's head" party this weekend. And here she is..., my little cake assistant, Skyla! Isn't she lovely? :)

She did a great job helping me decorate the cupcakes. We made funny faces on the cupcakes as well as topping them with colourful sugar animals, balls and marshmallows. By the time we finished, we tasted 2..3..4 of them (... can't remember how many...) and we both had sticky hands with icing;)

Oh and, I thought Skyla was a real chef because she asked me "can we try the cupcakes? Because we need to know how they tastes before we serve them, don't we?" I was like... "Sure, yes!"

Well done and thanks, Skyla;D

Enjoyed the article?

My best content on baking, cakes and breads. Delivered to you for free.


I won't send you spam. Unsubscribe at any time.

Miso cake (味噌ケーキ)


So..., I bet that most of the people will think "What?! Miso in a cake?" Believe it or no, it works! This traditional Japanese ingredients commonly used for "Misoshiru (みそ汁, miso soup) gives a depth of flavour to the cake. (Oh, that sounded like Master Chef judges...)

Although it's a little hard to find a good quality miso paste in England, Asian food shops or large supermarkets will have quite a few choices. 

This time I used "Mugi miso (barley miso) that has good bits of barley in the paste and tastes salty but a little sweet from the barley at the same time. Combined with dark brown sugar and browned butter, the cake smelt nice and rich even before I put them in the oven. 

...By the way, I always think it's a good sign when the cake mixture smells good when I'm tasting a recipe;)

Ok...so..., the verdict is... "simply good". Initially you can't taste the miso but you'll notice a subtle unique flavour and real richness. I liked it even better on the following day when the cake was well rested and more moist.

If you like a bit of "Japan" in sweets, why not try adding some savory Japanese ingredients in your cake;D

Ingredients:
Flour 100g
Dark brown sugar 100g
Egg 2
Butter 100g
Miso paste 2 tbsp

1. Preheat the oven to 180ºc. Brown butter.
2. Combine flour and sugar in a bowl and mix well.
3. Beat eggs and mix into 2.
4. Add miso paste to 3.
5. Fold in browned butter into 4.
6. Pour the mixture into a cake tin. Bake in the preheated oven (180ºc) for 20 minutes.


Enjoyed the article?

My best content on baking, cakes and breads. Delivered to you for free.


I won't send you spam. Unsubscribe at any time.